

Welcome back on these pages!
My adventure in the world of joinery is getting ahead.
Today I talk to you about the different ways that are usually used to connect wooden pieces .
In this article I will list the most common (later go into them one by one in specific articles).
Of course you'll have to choose the most suitable in each situation.
Unless the furniture is not done by following a style that provides visible screws, or already know that these will then be hidden in some way, you should apply the joints I explain in this article.
It must be said, however, that many of these joints, often are also consolidated by the use of screws and nails as well as by glue.
To accomplish some of these processes you will need a lot of practice and specific tools .
TYPES OF CONNECTION

There are basically 5 ways in which the pieces can be positioned to be joined through the different techniques that I will show:
- Coplanar Connecting : the two pieces come together on the short side, as if they were extensions of each other
- Coplanar side Connection : the pieces are joined side by side on the longest side
- T Connection: One of the two elements joins the other precisely forming a T (for example in the case of shelves in a closet)
- Cross Connection: The two pieces are joined forming an X.
- Corner Connection : the two pieces are joined forming an angle of 90 °
MOST COMMON JOINTS

Here are the most common types of junction and interlocking without the use of screws, nails or other metallic accessories:
- Butt joint
- Biscuits
- Tenon and mortise
- Half Lap
- Dovetail
Of course, as always, please report other items to be included in this list in order to make this blog even more complete and useful for everyone.
WOODWORKING JOINTS
BUTT JOINT
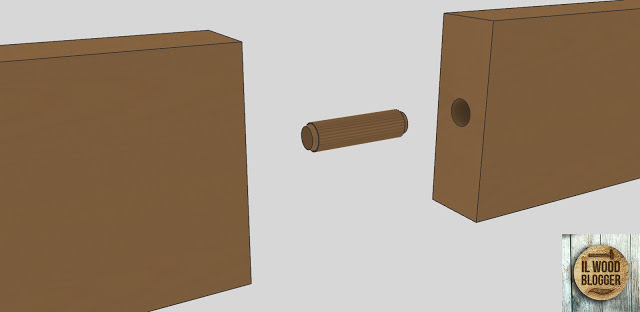
The Butt Joint is probably most common junction and simple to implement .
In fact, without the need to make special cuts is possible, thanks to wooden dowels , to create enough solid connections.
This methodology is used especially for peak coplanar unions and T-connections , but also for angular junctions.
The Butt Joint consists about the union of the pieces using wooden plugs .

The plugs , in this case cylindrical in shape, are inserted inside holes, blind or passers-by, practiced on the two pieces.
Inside the hole it is poured the glue to make the union more effective.
Very important is the diameter of the pins , and then the holes, which must be dimensioned to avoid weakening the workpiece (in the case of an excessively large diameter) or not be sufficiently solid (in the opposite case).
Usually it is advisable to drill holes equal to approximately 1/3 of the thickness of the wood.
In this way also decreases the possibility that the wood splits.
The plugs can be found ready for use in commerce or can be obtained by cutting a wooden rod.
The holes in which the pins are inserted can be practiced with a simple drill after marked the position, but the result may not be as accurate.
For this reason there are different types of dowelling guides that allows you to drill precise and perfectly perpendicular holes.

Here you can find a Pinning Kit with guides, drill bits, glue and pins of various sizes with a GREAT PRICE !
BISCUITS

The concept is identical to that of Butt Joint.
In this case the pieces are held together by elliptical wooden plates 4 mm thick and in different formats.
These biscuits are strung into slots created on the edges to be joined, together with the glue, and ensure a very strong union , also because the bonding surface of a biscuit is greater than that of a cilindrical pin.
The process, however, is slightly more complicated and will need a special milling machine for practicing the slots.
Also in this case you must choose the Biscuit format according to the thickness of the wood to be joined.
TENON & MORTISE

Probably a great classic of woodworking techniques.
It especially applies in the case of corner connections , or T joints and there are different variants.
In a dedicated article I'll illustrate 10 variants, but for the moment I'm just saying that in the picture is a classic blind mortise-tenon, so with hidden joint.
The principle of all these variants, however, is that there is a tenon , usually a tongue of squared section, which goes to insert into a mortise with the same shape.
The mortise can be blind or through as needed.
In the case of blind mortise , however, the tenon must be slightly shorter than the depth in which it must be inserted to be sure that it fits completely and to prevent it from escaping too much glue.
HALF LAP

Another great classic of traditional joinery is the Half Lap Joint .
Very useful especially in the case of cross-connections .
When choosing this type of union thickness of joint must be the same in both pieces.
In fact, as you can see from the picture above, it's removed on both pieces a dowel which is exactly deep half of the thickness, so that, once embedded the two tables, there are no discontinuities.
This will give the impression of having a single clean and perfect piece.
The Half Lap is a quite simple interlocking, but not too solid.
For this reason it's often reinforced with glue and screws.
DOVETAIL

Torment and delight for the Woodworker!
Dovetail is probably the joint with the better aesthetics among those listed in this article.
Especially when it's used for angled unions where the joint pattern remains clearly visible.
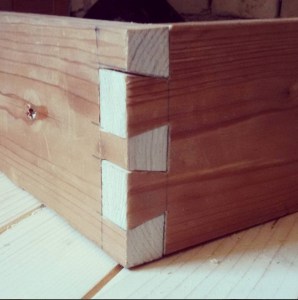
Unfortunately, like all good things, it is quite complicated to realize .
However it is also used for coplanar unions.
In fact, it needs patience, care and precision.
Of course there are here guides and tools that can help you!
You have to cut out, on the edge to be joined, a pattern composed of "tails" with the slightly flared angle.
It is thanks to this flaring , difficult to realize, that the joint appears to be solid and sturdy, and so beautiful.
Care must be taken when making a Dovetail because the slightest mistake can affect the success.
CONCLUSIONS
As you can understand, some of the joints mentioned are very difficult to achieve.
More than it can seem like watching them in these pictures.
In fact you need to do a lot of practice and several attempts and not having to ditching work hours when we made an object.
My advice to you is to practice a lot because when you'll manage joints , with a solid and clean result, the satisfaction will pay for all the effort made.
This is an Open Source page too!
As the article about Common Wood Species and that about Artificial Woods this is an Open Source content too.
This means you can help me to make it more accurate and precise as possible, enriching it with your tips and your knowledge.
How to contribute to the project?
In a TOTALLY FREE way
Just type the text you'd like to insert in the article, in the comments below and I will provide to implement it in Blog writing your name among the authors of the post!
So easy!
I remind you that to stay up to date on my articles and don't miss the news you can Subscribe to the newsletter (down-left) and follow my Facebook page , my profile Instagram and my Pinterest .
Until next time!
The Wood Blogger


Thank your lesson, very apreciated.